

As the sunlight hours get longer and the temperatures begin to climb, I’m eager to start enjoying more time in my yard. Soon, I’ll be filling the planter boxes on my deck with colorful flowers.
Last spring, when I planted flowers on my deck, I discovered how much l loved watching the butterflies that gathered around the blooms.
This year, I knew I wanted more butterfly visits to my home and discovered that adding a butterfly bath will not only attract them, but it will also help keep butterflies thriving.

I had never heard of a butterfly bath before, but learned these garden features are similar to birdbaths. While birds love splashing around in their baths, butterflies need shallower water than birdbaths to avoid drowning or damaging their delicate wings. They use their long, tongue-like proboscis to reach and drink the water to avoid getting wet as much as possible.
While there are shallow birdbaths that could be used as a butterfly bath, I decided to make a bath specifically designed for butterflies for my deck. I confess that I’m no Martha Stewart when it comes to crafts, but after looking at a few pictures of butterfly baths, I knew I could tackle this project.
My goal? To make a butterfly bath with only a $10 budget. So, off to Dollar Tree I went to gather my materials.
What You’ll Need To Make A Butterfly Bath
I truly kept this project simple and picked up the following supplies:
- A shallow dish or plate
- Decorative rocks
- Sponges (non-scouring)
- A strong adhesive or glue
- A plastic flower pot
- Note: I also used a pair of scissors I had at home
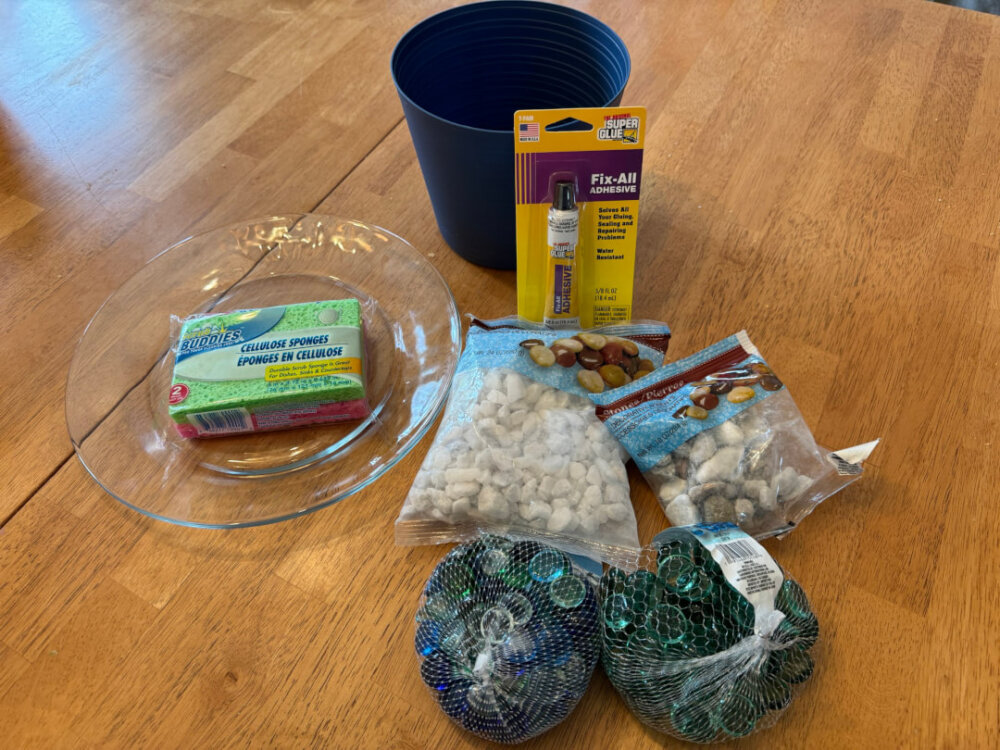
That’s all you need. Of course, you can get as fancy as you want with your supplies; I saw some examples using terra cotta pots and other more expensive items. But, we’re looking to stay on a tight budget, and I thought these would look nice together.
Altogether, the supplies pictured in the photo above cost me $10 ( eight items at $1.25 each).
How To Make A Butterfly Bath
When building a butterfly bath, you need to remember that the goal is to provide plenty of places for the butterflies to land while they drink. The decorative stones don’t only look pretty, they help keep the butterflies safe and dry.
Step One: Prepare The Rocks And Sponge
The marbled stones looked clean, but the decorative rocks looked pretty dusty and dirty. While I know this is going outside, I wanted to make sure the rocks didn’t contaminate the butterflies’ drinking water. So I rinsed them in a colander and put them on a paper towel to dry.
I also cut one of the sponges in half so it would fit better on the plate. The sponge serves not only as a tall landing place for the butterflies, it also ensures the water level stays consistent on the plate.
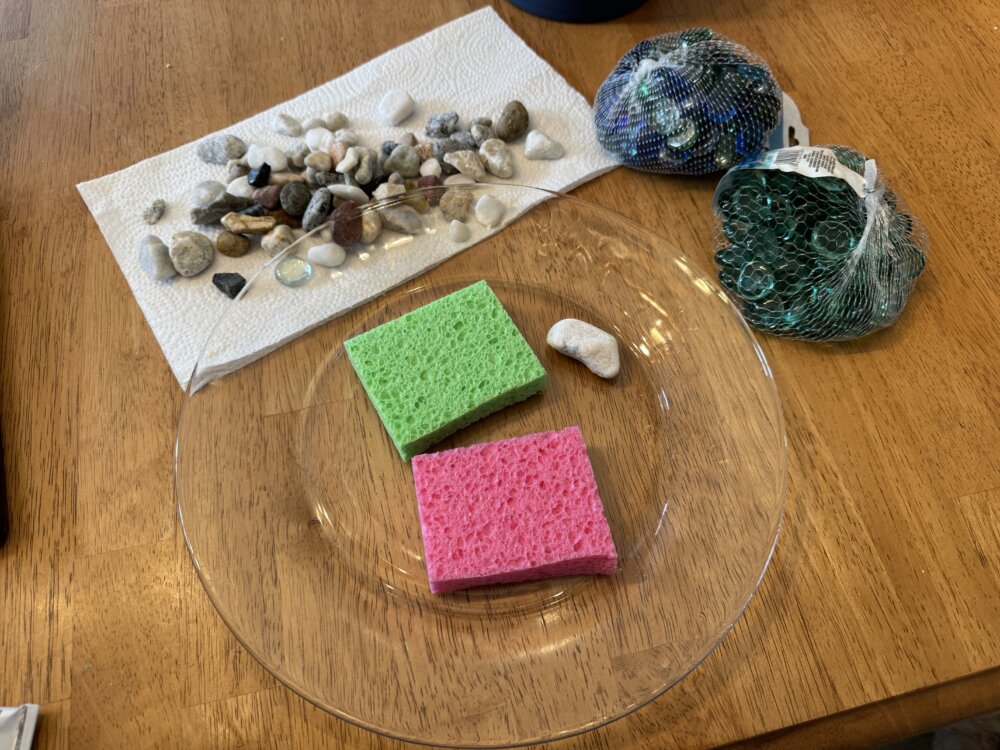
I decided to keep only one sponge in the butterfly bath, because I knew I would be filling it with the rocks and I didn’t want to overcrowd it.
Step Two: Fill And Decorate The Butterfly Bath
Originally, I planned to decorate the entire rim of the plate with the flat marble rocks using the adhesive. After fighting with the glue and the rocks sliding, I opted to keep those to a minimum and simply fill the plate with rocks.
If you want to create a design, make sure to get an adhesive that will stick to the surface you’re working with in your butterfly bath. Also note, it will take up to 24 hours for the glue to dry.
After some trial and error, I used a combination of the marble stones and the decorative rocks to surround the sponge and to complete the butterfly bath interior. It was as easy as just placing them on the plate and moving them around until I liked the way it looked.
Step Three: Attach The Plate To The Flower Pot Base (Optional)
You can use the butterfly bath without a base, and many gardeners choose to place it on the ground near flower beds. But, since I have a deck, I decided to get a flower pot as the base and attach the plate to it using the adhesive.
In the future, I will buy name brand Super Glue for projects like this. The adhesive I got at the Dollar Tree was OK, but it didn’t stick or set as quickly as the original.
I’m happy with the final result of my butterfly bath!
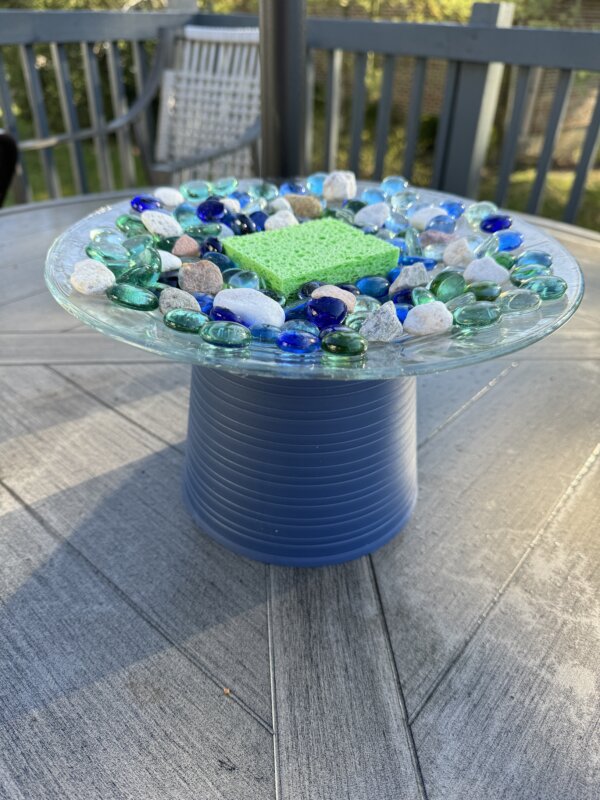
All I need to do now is add water and this will be ready to go. Once the weather gets a little warmer, I can’t wait to see the butterflies gather on my deck to enjoy a sip of water in their own butterfly bath.
You Can Make A Butterfly Bath For Just $5
When all was said and done, I used the plate, one sponge from the two-sponge pack and only two of the rock packs I purchased at the Dollar Tree. That brings my grand total budget for building a butterfly bath to just $5.
I stored the extra sponges to swap out during the spring and summer season, as I’m sure the sponge in the butterfly bath now will need replacing.
If I had used a deeper dish, like a pie plate, I probably would have used more of the stones. But, I’ll hold onto them for the next creative project I tackle.
This story originally appeared on Don't Waste Your Money.